
Home Blog Page 41

5 Best Free WordPress Plugins to Automatically Watermark Images

WordPress Plugins to Automatically Watermark Images

WordPress is the most popular CMS that powered millions of websites online. It has large community of developers who contribute in plugins and themes. This is why we can do any kind of task in WordPress with available plugins. In this post, we will see few nice plugins to add a watermark in your WordPress website’s images.

If you have a photo blog, it is must to add a watermark on your images and prevent unauthorized use of your images anywhere else. Watermark is the mark (logo, text or signature) on an image.

Whenever someone copy your images, he will have images with your watermark. People will easily identify that images belong to you. Here i have listed top 5 free plugins to apply automatically watermark on your wordpress images.

#1. Easy Watermark

Easy Watermark Plugin help you to automatically watermark images when they are uploaded to the WordPress Media Library. You can also add watermark to existing images manually. It can add text or image watermarks. Image watermark can be a jpg, png or gif. Text watermark is generated using ttf fonts. In text watermark, you can set color, size and rotation.

https://wordpress.org/plugins/easy-watermark

#2. Image Watermark

Image Watermark allows you to automatically watermark images uploaded to the WordPress Media Library and bulk watermark previously uploaded images.

https://wordpress.org/plugins/image-watermark/

#3. Watermark RELOADED

Watermark Reloaded is another popular WordPress plugin to place a watermark on your website’s images. You can add watermark with customizable fonts, size and position. This plugin requires PHP5, GD extension and FreeType Library. You can also position the watermark anywhere on the image within Watermark RELOADED settings. Watermarking settings are simple to use and provide you with instant preview of how your watermark will look like on the uploaded image. It is also available in free and premium versions.

https://wordpress.org/plugins/watermark-reloaded/

#4. Watermark WP Image Protect

Watermark WP Image Protect allows you to watermark all the images on your site. Unlike other watermarking techniques and plugins, the original images are unaffected and you do not need to edit or re-upload the images, it is done automatically for you on-the-fly.

https://wordpress.org/plugins/wp-image-protect/

#5. Transparent Image Watermark

This plugin allows you to Automatically add a watermark to all images as they are uploaded to the WordPress Media Library. The plugin uses PNG watermark images with transparency for precise control over the appearance of the watermarks. This plugin also supports simple text watermarks with adjustable color, size and transparency.

https://wordpress.org/plugins/transparent-image-watermark-plugin

I hope these watermark wordpress plugins help you to protect your blogs images. If you know any other best watermark plugin, please add in comment.

SEO Tags: Best WordPress Plugins, Watermark Software Free, Best Free Watermark Software, Watermark Image Software, Create Watermark Image

10 Best Free Web Proxy VPN Chrome Extensions to Surf Anonymously

A free Web Proxy that provides security and anonymity while surfing the Web.
It hides your real IP address, encrypts your traffic communication to the web, hide your internet history and protecting your online identity.

Why WE use a web proxy?

1. To Surf websites anonymously.
2. Hide and change IP address (your ‘online fingerprint’).
3. Conceal web browsing history.
4. SSL encryption for all websites.
5. Bypass web filters and geographic internet blocks.

We can do lot of things by using proxies. you can access any blocked, censored websites Anonymously.

There are many Web Proxy Sites available but the great thing is a simple to use chrome extensions available, so you can change ip in just one click. Here are top 10 Anonymous Web Proxy chrome extensions available to use.

Top 10 Free VPN Chrome Extensions:

1. Proxy SwitchyOmega

Changing proxy settings has never been so convenient. This is the right tool for you if you need to work with proxies in your browser, for whatever reason. SwitchyOmega is like the system “Proxy Settings” dialog, but designed to be simpler, quicker and more powerful.

>>>Get Here

2. CyberGhost VPN

CyberGhost’s Chrome browser extension is FREE to use for everybody. It’s also very easy to use. Just hit our Power button and your IP will be changed in a second.

>>>Get Here

3. Gom VPN

Gom is a configuration-free unblocking app that makes these issues go away.
To use, just press the Gom button.

>>>Get Here

4. Hola

FREE and secure VPN. Access websites blocked or censored in your country, company or school and stream media with the free Hola Unblocker VPN proxy service.

Hola is a free and ad-free VPN proxy service that provides a faster and more open Internet.

>>>Get Here

5. ZenMate

ZenMate Security, Privacy & Unblock VPN – The easiest way to stay secure and private online while accessing the content you love. ZenMate Security, Privacy & Unblock VPN is trusted by over 10 mio. users.

>>>Get Here

6. Hide My Ass

Hide My Ass! operates the most popular browser based web proxy online, this is our official extension that enables you to easily redirect your web traffic through our anonymous proxy network.

>>>Get Here

7. Proxy SwitchySharp

Manage and switch between multiple proxies quickly & easily. Based on “Proxy Switchy!” & “SwitchyPlus”

>>>Get Here

8. Webproxy.net

Webproxy.net is a Free Web Proxy to surf anonymously online, unblock any website, secure your internet connection and protect your online identity.
Access websites blocked or restricted in your country, company or school and secure your browsing with totally free Webproxy proxy service. This Free Web Proxy website also provide chrome extension.

>>>Get Here

9. DotVPN

DotVPN is something which is better than VPN: it opens a whole new world in the era of identity protection and foiling censorship in all countries.

>>>Get Here

10. FreeMyBrowser

A VPN Extension without traffic limitations or any other boundaries: Free your browser from censorship and borders to browse secure and free the Internet.
Encrypt all your browsers traffic through the country of your choice!

>>>Get Here

How to Submit WordPress Sitemap in Google Webmasters Tools

Submitting a sitemap into google webmasters is very important for any new blog.

If you submit sitemap then your blog index properly and you will use many features of google webmasters.

Google Webmasters is a free online tool that helps you manage the technical side of your website. The tools are indispensable for SEOs, especially since the various diagnostic reports give straight-from-the-horse’s-mouth insight on everything from broken pages to link penalties.

If you Want to know why your pages can’t be found in google search? Google Webmasters help you to give answers. It’s also Google’s hotline to communicate with website owners.

So if any issues or penalties occur with your site, those crucial messages will come to you through Google Webmaster Tools.

Learn: How to Create XML Sitemap for WordPress Blog

How to Submit WordPress Sitemap in Google Webmaster Tools:

Recommended Guide: Google Webmaster Tools Tutorial

After creating xml sitemap for wordpress blog, you have to submit xml wordpress sitemap in google webmaster tools. Follow bellow steps.

  • Open https://www.google.co.in/webmasters and signin with your gmail account.
  • Verify domain ownership in google webmasters. If your WordPress site is not verified you can read here How to Setup and Verify Website Ownership
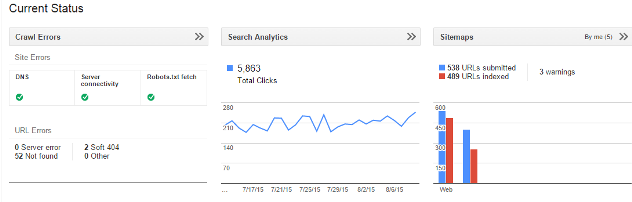
  • After Verification, click on website in webmasters tools. now you will redirect in Google Webmaster Tools Dashboard. Here you will see a sitemaps board. see in snapshot.google sitemap
  • Click on sitemaps. Now click on right side red button add/test sitemap.
  • Now enter XML sitemap of your wordpress blog which is generated by sitemap plugin. your generated sitemap look like https://www.itechcube.com/sitemap.xml, Now add only sitemap.xml in webmasters.
  • Submit sitemap and wait few hours to index your blog into google.
  • That’s it.

Video For For Verifying Website Ownership

SEO Tags: XML Sitemap Generator, XML Sitemaps WordPress, Google Sitemap Generator, Google Webmaster Tools Verification Code

How to Create XML Sitemap for WordPress Blog With Video

After starting a new wordpress blog, you have to do many works like setting seo friendly permalinks, themes selection and customization, plugins installation and much more thing. But creating sitemap is most important for your wordpress blog.

When you create your blog sitemap and submit in google webmaster tool then your blog index properly and you will use many features of google webmasters.

Learn: How to Setup Google Webmaster Tool and Verify Website Ownership

So you have to think about wordpress XML sitemap and know How to Create a Sitemap in WordPress to Add Sitemap to WordPress.

Create XML Sitemap for WordPress

For WordPress, There are many WordPress Sitemap Plugin available to Create WordPress XML Sitemap. A plugin Google XML Sitemap Generator is very popular and simple WordPress XML Sitemap Plugin. but we recommend you to use wordpress seo by yoast, this plugin also improve your site SEO and create XML site map for both content and images.

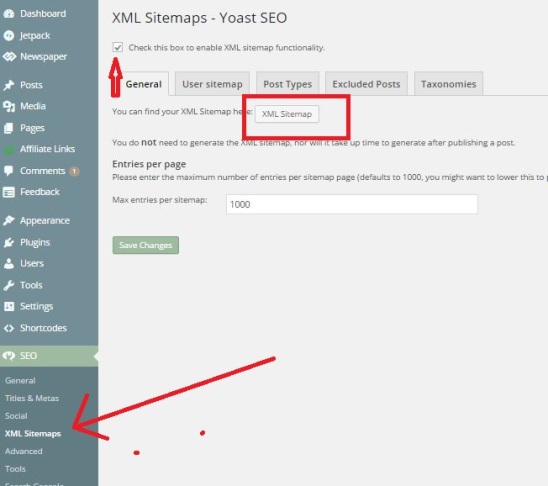
  • Mark Check box to enable XML sitemap feature in Yoast SEO plugin.
  • Now Click on XML Sitemap button to generate xml sitemap for WordPress blog.
  • A new WordPress Sitemap Page will open, and you see xml sitemap for post, page, category, tags, and author.
  • Thats it, your sitemaps generated successfully.

Now next thing you have to do is to submit wordpress sitemap into google webmaster tools.

You can Watch Video For Submitting Sitemap

SEO Tags: Sitemap Plugin for WordPress, Google XML Sitemaps Plugin, Google Sitemap Generator, Google Sitemap Creator

Porn Banned: 5 Ways To Access Banned Sites in India

Indian government banned over 800+ porn websites. Internet is our freedom and its our decision what we search on Internet, What i watch on Internet, Its all our decision.

Many peoples and also celebrity reacted to this government decision.

Sonam Kapoor tweeted, “Ban idiots who think banning things is going to make a difference to Indian mentality..”

Tanishaa Mukerji said, “As adults, we are perfectly capable of making choices and they put barriers to what we should watch or do in the privacy of our home. It’s a free country, people should be allowed to choose what they want to watch, eat and how they feel, instead of being attacked on a public forum for having an opinion different from yours. Arguing against censorship of pornography does not mean condoning, ignoring or de-prioritising campaigns around the often violent and usually misogynist portrayal of women in capitalist society. We have a responsibility to counter in the most effective way images which are exploitative and sexist — not by seeking to have them banned, but by initiating a much more wide-ranging debate about sex; by campaigning for better sex education in schools; and by creating more informed and responsible social attitudes to the expression of sexuality.”

But You don’t worry, If you would like to watch porn on banned sites. here the 5 ways you can use.

1). By Using ProxySite.com

Yes with Proxysite.com, you can open any blocked site. proxysite.com will open entered site from us server. so you can open all blocked sites in India.

GO to ProxySite.com

2). By SecurityKiss Tunnel

SecurityKiss is a free VPN tunnel tool. By using this tootl you can change IP address of your system and network. SecurityKiss available for all your devices. for your windows laptop, android mobile, iOS and others.

61185 2

Get SecurityKiss Tunnel

3). By Using Chrome Extension

If you are using google chrome browser then you can easily open any blocked sites. There are many free VPN extensions available. You can read more about How to Access Blocked Websites in Google Chrome here.

4). By FilterBypass.me

FilterBypass is also same as Proxysite.com. Filterbypass is also a good proxy site. with this online proxy tool you can access any site from different ip addresses of other country like USA, UK.

Go to Filterbypass.me

5). By Online Translation services

Online translation services can also work as a good proxy server for you. You can access blocked websites with Google Translator or Bing Translator. you only need to enter the URL on these services and it will return the translated version of the page. Just use English to English translation and see the website unblocked. If not open then Select different language and translate.

3 Basic Ways to Install WordPress Plugins

WordPress is the best blogging tool ever. And wordpress plugins are behind the popularity of wordpress.

WordPress plugins are helpful tools used by users and developers to extend WordPress functionality. There are many free and premium plugins available on the Internet, but some beginners are confused about how to properly install WordPress plugins in their wordpress blog.

Yesterday one of our reader asked me ‘How to Add Plugins to WordPress-Blog‘. So Here we come out with the detailed step by step WordPress Plugin Tutorial to properly install wordpress plugins.

Note: Remember that if you are running a self hosted blog then you will be able to install wordpress plugins. WordPress.com blogs does’t have option to install plugins.

Recommended: Must Have WordPress Plugins

From Where We can get Best WordPress Plugins

There are thousands of Free and Premium WordPress plugins available online, But where we can get well coded and working plugins. Simply, you can get a large number of free plugins on WordPress Plugin Directory, which contains plugins on every category. these plugins are considered thoroughly tested and secure.

There are many developers, who provide good plugins for free and paid. You can Find the Best Pro Plugins Here.

For Premium Plugins, Prefer https://codecanyon.net/. Its a large place for premium wordpress plugin.

Check Out: Best WordPress Plugins for SEO

How to Install WordPress Plugins:

There are three methods to install wordpress plugins. 1). Simply By Searching from Dashboard 2). By Uploading From WordPress Dashboard 3). From FTP

1). Install WordPress Plugin in Dashboard

This is the easiest method to install wordpress plugins. But note that this method is only suitable for plugins in the WordPress Plugins Directory. Follow step by Step Guide.

  • First login to your WordPress dashboard.
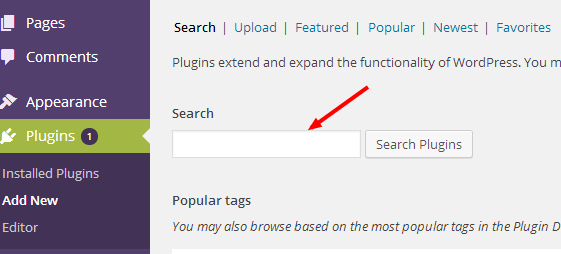
  • Now go to Plugins>>Add Newinstal wordpress plugin


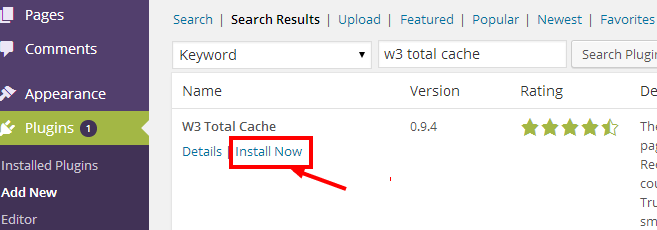
  • Search any plugin you want. And Install plugin.install plugin in wordpress


  • After Installation done. you need to activate the plugin first, then you can configure the settings for specific usage.activate plugin


2). Install Plugins by Uploading Process

This is very popular method to install wordpress plugin. When you want to install some premium plugins from third party websites. In this condition, you cannot achieve the process by installing it on WordPress Dashboard, but should upload its installation.

  • First Download all your plugins file.
  • Go to WordPress Dashboard.
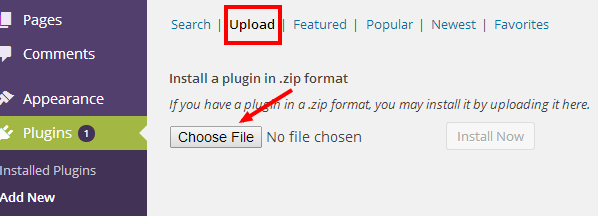
  • Now got to Plugins>>Add new>>Click on Uploadupload plugins


  • Now click on choose file and select plugin zip file on your system. and upload it.
  • After complete uploading process, Then activate plugin and customize.

3). Install Plugins Manually With FTP

This is the least user-friendly way to install a WordPress plugin. If you are new to WordPress and have no idea about FTP Manager, we don’t recommend you utilize this method.

  • First you have to install ftp client in your system( if you don’t have).Here are the top 5 FTP clients available. I recommend to use Filezilla.
  • Unzip your plugins files locally.
  • Then open FTP Client and access your host (public_html).
  • Then open /wp-content/plugins/ and upload plugin files properly.
  • Once all files uploaded, go to wordpress dashboard.
  • And click on the Plugins tab. Find the installed plugin and activate this and configure the settings.

Hope this Basic WordPress Tutorial will help you to learn WordPress plugin installation process.